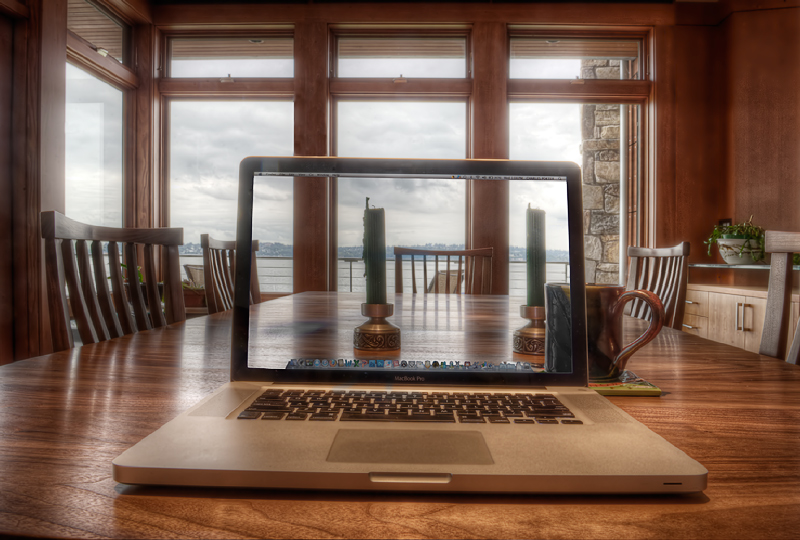
Photographer’s Notes I’ve been playing around with this concept for a while, now, and this was the perfect challenge to shoot the concept seriously. Stuff I’ve shot lately and liked, with one exception, hasn’t scored very well. Maybe this will break my streak!
The general approach is to shoot the same scene twice, once with the laptop (or any other device you want to be transparent), and once without. In Photoshop, lay the device photo in its own layer, over the non-device layer. Use auto-align to line them up perfectly.
Using a mask, hide the screen of the laptop letting the non-device photo show through and Bob’s your Uncle.
Easily enough said, but background is key to making the photo interesting and believable. This isn’t the greatest background. I had thought to shoot something in a Starbucks … but Starbucks wasn’t keen on letting me set up my camera, tripod in their store … and people in the background are messy. They move around which spoils the effect. And they don’t take direction well. When you yell, “Now hold very still,” they don’t cooperate and multiple attempts is probably what discouraged Starbucks from letting me continue.
In this case, with this background, brightness was an issue. So I ended up shooting a 7-set HDR series for each photo and tonemapping in Photomatis before combining the remaining two resulting images. This creates a bunch of artifacts I needed to clean up in Photoshop. What else have I got to do with my time?
I had also been playing around with a panorama concept that I liked a lot. I shot about 30 photos from unconventional angles and photo-merged them in Photoshop. I played with layer styles. Fun. You can see the results below. Before I flattened and resized, it is a 1.5 Gig image approximately 10,000 pixels on a side. I decided not to use it because I didn’t think it fit the challenge as well. Time will tell.
Post Processing • Photo 1
o HDR 7 Originals (Photomatix)
o Tonemap (Photomatix)
o Manage Color (PSCS5 Hue/Sat Layer)
o Manage Brightness (PSCS5 Curves Layer)
• Photo 2
o HDR 7 Originals (Photomatix)
o Tonemap (Photomatix)
o Manage Color (PSCS5 Hue/Sat Layer)
• Stack Photo 2 over Photo 1 (PSCS5)
• Mask Photo 2 (PSCS5)
• Correct Lens Distortion (PSCS5 Transform>Distort)
• Reduce Noise (Neat Image + PSCS5 Blur Layer - Masked)
• Contrast (PSCS5 Curves Layer – Luminosity Blend Mode)
• Brighten (PSCS5 Curves Layer)
• Partially Desaturate (PSCS5 Hue/Sat Layer)
• Clean Up HDR Artifacts (PSCS5 Clone Layer)
• Crop (PSCS5)
• Resize (Genuine Fractals)
• Sharpen (PSCS5 High Pass Filter)
• Partially Desat Laptop Icon Bar (PSCS5 Hue/Sat Layer)
• Save for Web (PSCS5)
Camera Data • Date: 2011.09.14
• Camera: Nikon D3
• Lens: Nikon AF-S Zoom-Nikkor 28-70mm f/2.8D IF-ED
• ISO: 400
• Aperture: f/22
• Shutter: Various between 1/60 and 1/4
Statistics
Place: 6 out of 65 Avg (all users): 7.0775 Avg (commenters): 8.0588 Avg (participants): 6.8438 Avg (non-participants): 7.1455 Views since voting: 4548 Views during voting: 502 Votes: 142 Comments: 31 Favorites: 8 (view)
great smart image and I like the story very much, especially your observations about people at Starbucks (I too had the feeling they do what they want).
I'm thinking this is real. I'm guessing you took a photo and are displaying it on the screen, perhaps as the wallpaper image. Very cool effect well done.





 Add photograph to your favorites
 Add photographer to your favorites

 Photographer found comment helpful.