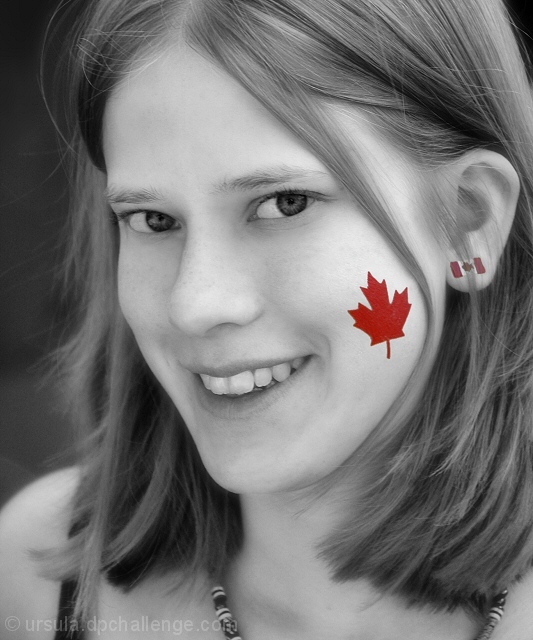
One of my first pictures with the new Nikon, using the regular zoom lens that comes with the kit.
Steps:
- Cropped, selected area to remain in red and feathered very slightly (2px), promoted selection to new layer.
- Worked on original layer (adjusted contrast, cloned out small light/dark spots on the skin and background).
- split to RGB.
- Converted original to b/w using channel mixer.
- Copied red channel (from RGB split) and pasted in as a new layer over the original. Erased eyes in second layer, blended at soft light with background, and merged the two layers (not the top one containing the mapleleaf and flag).
- Made a copy of background (b/w) layer and applied a soft focus filter. Blended with background at about 80%, erased portions (eyes and lips) I didn't want soft.
- Merged all layers, resized, sharpened.
Statistics
Place: 38 out of 227 Avg (all users): 5.8293 Avg (commenters): 7.0000 Avg (participants): 5.8400 Avg (non-participants): 5.8125 Views since voting: 1434 Votes: 205 Comments: 13 Favorites: 1 (view)
Nice try - and a good high contrast picture to use. Looks to me that the greens and blues on desaturation removed some of the hues that make the red look real. This looks like a black and white picture with a pure red icon drawn on it - and you very seldom find a pure red anywhere - except in some roses.
I would like to see this photo with her lips and maybe eyes still colored as well as the maple leaf and earring. I also wish the hair wasn't blocking the earring. The wisp of hair between the leaf and earring is perfect by itself.






 Add photograph to your favorites
 Add photographer to your favorites


 Photographer found comment helpful.


