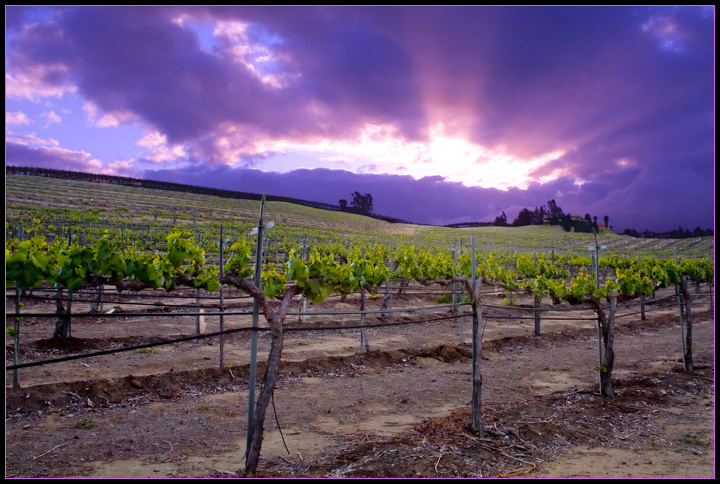
There unfortunately aren't too many stunning landscapes near me. However, I had a feeling an early morning shot at the Temecula wineries (about an hour away from me) might have some potential. I'm REALLY glad this challenge was Expert Editing, since it gave me the chance to combine the awesome sky and vineyards in the foreground from two separate exposures of the same landscape. :)
I made RAW adjustments to both photos. Instead of using HDR, I combined the two photos as separate layers in the same image in Photoshop. I manually selected where I wanted the top of the hills to blend with the sky. So the sky is from one exposure, the foreground is from another. I dodged and burned areas near the house on the right-hand side. I also blurred the line where sky and ground meet. Also used were adjustment layers for Levels and Hue/Saturation, use of a duplicate layer or two, Noise Ninja, and cloning out dust spots and minor distracting elements. I'm glad that this challenge let me submit this as 720 px. :)
Statistics
Place: 139 out of 308 Avg (all users): 5.7615 Avg (commenters): 6.6667 Avg (participants): 5.5222 Avg (non-participants): 5.8882 Views since voting: 908 Views during voting: 388 Votes: 260 Comments: 11 Favorites: 0
Positives: Very well composed and framed. Composition is the strength of this image. The angle on the grape vines has a nice flowing look that acts like leading lines right up to the sky.
Technicals: HDR might not have worked well because the two images combined were really not the same. I'm no expert so could be wrong. In any regard, what you did was a sky replacment. The reason I know you did an above average job with the sky replacement is because I didn't notice it had been done when voting. Now that I know I reviewed it closer and can see the edging on some of the trees is a little sharper than it should be and noted the lighting on the grapes is a little flatter than it should be for that sky.
That aside, the biggest technical defect in this image is the overexposed sky. DPCers tend to tolerate overexposed patches in images moreso than the "real" world. Also, sky color is overdone with the lavender/blue color cast. Ironically, the color cast that I don't like made the thin levender part of the border a nice framing choice. :)
The Challenge: Big shocker! This meets the challenge.
In expert editing voters expect higher technical quality than in other challenges and the color cast sky and overexposed patch may have hurt it in voting.
You got a 5.7 which is .3 or so above the overall DPC average .1 above the average for its specific challenge. Basically voters said it is OK but still average. Looks like the strength of composition counterbalanced the technicals.
I gave it a 6. That means I thought it was below average but not a failure. That is a damning score from me. The group liked it better than I did and that is unusual. The overexposed patch and the color cast is what brought down the image for me. Under normal conditions, like in your image, I think overexposed areas should almost never be allowed, especially under advanced and expert editing rules. In basic rules I'd feel the image should not be submitted at all.
Suggestions: This is a great image and there is much that can be done to turn it into a ribbon contender.
First off, correct that hideous overexposure.(Is this the Simon Cowell coming out in me?) Its easier than you think. A simple trick is to clone light cloud or sky detail from another part of the image over the overexposed area. The key is to use a very low opacity feathered brush and paint in some detail, just don't go over 25% total. I guarantee you'll be AMAZED at the improvement and it won't look the least bit cloned.
Back off the magentas and blues in the sky. There are several ways to do that. One worth considering is simply to desaturate the sky some to make it look more naturally realistic with the ground while still maintaining the colors you want. You'll be surprised the amount of positive effect can that can come from a small amount of desaturation.
Apply dodging to lengthen and enhance the light beams in the sky for added drama and effect.
Sky Replacement Considerations The things you have to keep in mind in sky replacements are:
1-You need a really good sky selection or mask to start with (looks like your selection or masking was good)
2-No matter how easy they tell you it is in tutorials you will ALWAYS have to "hand" work the boundaries. (I'm guessing you spent considerable time and effort with yours)
3-Any defects in your sky replacement processing will show up like a sore thumb in a print when you can get away with it in a web graphic. (Defects would in prints of this image)
4-It is paramount that your border softness is exactly the same pixel width as other similar areas of the image. Use blur tools for that.
5-Lighting quality and color, intensity and direction must be perfectly matched between sky and ground. Yours is OK but not great. Always strive for perfection because faults easily show up in sky replacements.
That being said, you might consider applying a bit of blurring to the sky/horizon boundary and darken the lighting on the grapes. Chosing a brush in mode "vivid light" set to black might make the lighting of the grapes more consistent with the sky and add an attractive dusk-like glow to it. You might consider an overall darkening, sorta like an internal vignette, near the horizon for a more natural transitional look.





 Add photograph to your favorites
 Add photographer to your favorites

 Photographer found comment helpful.


