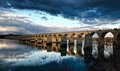
I see that image PP free-for-all seems to be pretty popular. I am pretty happy with this image in general, so I thought that maybe some folks'd like a crack at it.
Thanks! Mother Nature was showing off BIG time Sunday evening!
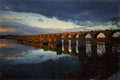
I like your edit a lot!
thanks so much! it couldnt have been done without the great shot. i couldnt decide if other people would like how dark/moody i made the clouds but i thought it helped to frame the bridge
Lightroom Cloned out dust bunnies
"Phaded Photo" preset
Graduated filter from top reducing exposure
Graduated filter from right side boosting exposure a tad <-- If done over again I'd probably leave this out
Graduated filter from lower right reducing exposure
Graduated filter from left side reducing exposure
Photoshop Copied a section of reflected sky from the water and flipped it into the sky to lessen the impact of the bright spot and faded it in with a fuzzy eraser
Blurred the ripples out of the new sky
Some dodging and burning of bridge and sky
High Pass on new overlay layer
Resize and sharpen
Afterthought... I burned the bridge on the right and dodged the middle to bring the sun's spotlight back in.
Lightroom Cloned out dust bunnies
"Phaded Photo" preset
Graduated filter from top reducing exposure
Graduated filter from right side boosting exposure a tad <-- If done over again I'd probably leave this out
Graduated filter from lower right reducing exposure
Graduated filter from left side reducing exposure
Photoshop Copied a section of reflected sky from the water and flipped it into the sky to lessen the impact of the bright spot and faded it in with a fuzzy eraser
Blurred the ripples out of the new sky
Some dodging and burning of bridge and sky
High Pass on new overlay layer
Resize and sharpen
Afterthought... I burned the bridge on the right and dodged the middle to bring the sun's spotlight back in.
That's amazing.....that's what it looked like right before I left but I couldn't get the exposure the way I wanted it, so I ended up with dark images with zero detail.
That's amazing.....that's what it looked like right before I left but I couldn't get the exposure the way I wanted it, so I ended up with dark images with zero detail.
Processing:
1. Clone dust bunnies
2. dupe BG layer and do a selective color adjustment on the whites, this fills in the empty part of the sky a bit.
3. set that layer to luminosity mode, then dupe it
4. set the new layer to color mode.
5. adjust opacity of both those layers until sky looks natural, then flatten the whole thing and that's your new base exposure.
6. now dupe that and run Topaz detail on it. I used a custom preset I have called "jetty", but I derived that from the supplied preset "deep blue sky" so start with that and fiddle a little. Color isn't the issue here, we fix that later, it's just about the values. Adjust the sliders in "tones" area to change relative values.
7. Now do a hue/sat and work on the blues, cyans, reds, and yellows.
That's basically the ticket. Took longer to type it than to do it.
R.
ETA: Oh yeah, I created an empty new layer in multiply mode, filled with white, made the foregrounhd color picker the same color as the darkest part of the clouds, and drew foreground-to-transparent gradients in all 4 directions and faded the layer to make this more subtle.